

The brief for this piece called for a "busy city scene: skyscrapers, busy sidewalks and streets filled with cars, trucks, fire trucks, jets in the sky..." - words that would strike fear into the heart of any illustrator working on tight deadlines, myself included!
I started by looking at a lot of city scenes, just to fill my head with the feel of a busy city, and to load up on some of the various content you might see in such a locale.
The poem accompanying this picture is actually about how you often catch moments of quiet amid the bustle of city noise, maybe by ducking into a bagel shop, or whatever. The brief also added, "...perhaps at sunset to convey the sense that quiet is imminent." This was discussed with the editor and we concluded that flipping this around, setting the scene at sunrise would deliver exactly what we wanted, a sense of short-lived quiet soon to be overtaken by the impending day.
Surrounded by a ton of city reference images, I cobbled together this rough. It doesn't look like much, but it has a sense of place and light. The colors are consistent, the values are reasonably well arranged. There's a very simple color scheme, almost monochromatic (the lights are warm, yellow/reddish and the unlit areas are greenish).

This is a solid context for adding as much detail as I want. When I did this it was almost like rendering a dream image. Parts of it don't make sense, for example, the white square back of the truck is actually facing the wrong way. I'm not sure at this point if that's a one way street or a two way street (or a three way street, by the looks of it). But the right feeling is there - something I personally would never get from doing a tight pencil drawing at this stage.
Now where to start painting? A lot of beginning artists have trouble with that, so I'll say it again - it doesn't matter! Start anywhere. Wherever you feel like starting. Wherever looks easiest. Wherever looks like you have some idea what you might do there. Does any area, when you look at it, give you the feeling, "well I guess I could add some detail to that car..." or whatever? Or maybe, "I guess I could start tightening up the lines of those buildings on the left.
Maybe part of the picture looks pretty good but needs a little correction... sort of like you see a lion's form (or whatever) a cloud, but it doesn't look quite right because the eye is too high... it just needs a little re-positioning of the eye and maybe making the mane more symmetrical. Even if it's just one little thing, like, "I guess I could make the side of that building a little straighter" that's good enough. You just need to get going, then "the other you" will become engaged and take over!
Here's my first pass at adding some detail and tightening things up.

Even though, as I said, I could start anywhere, I want to be careful to not let any one area of the picture get too far ahead or fall too far behind. Once I establish the basic image, then get going, I continually scan for whatever is the least developed part of the picture, whatever is bothering me, and bring that up to snuff. Lather, rinse, repeat.
Stapleton Kearns refers to this as "herding sheep." That is to say, bring all areas of the image along together. Don't think this means all areas of the picture should, in the end, be developed or finished equally. Typically certain areas are much more finished than others. But within this general framework or target, don't let any one area fall too far behind relative to the others, and relative to its role in the overall picture. This is especially critical in a picture like this, because one false move and the thing will absolutely fall apart. In fact, right now that yellow truck is in danger of having that effect...

That little light triangle in the upper left is definitely a problem, definitely grabbing too much attention. At the same time, that relatively little and simple shape is giving some crucial form and space information. It's very often the case that what is making a powerful 3d statement is also at risk of killing the 2d statement. Most of it is going to be trimmed off, leaving just enough of the bottom point to serve my purpose, without being an eye sore. But I'll soften the blow a bit by making that area of sky darker than it logically "should" be, and also making the shape a bit more complex.

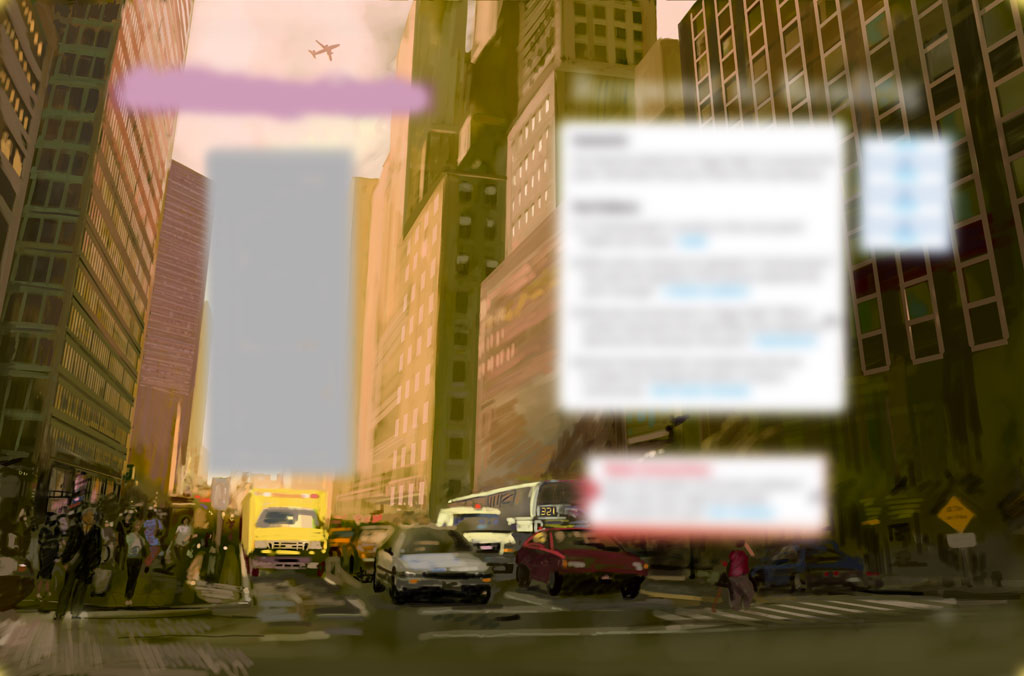
This image shows where the text will be placed over the picture (in case you were wondering about that huge open area of sky. The placement of the jet plane must work relative to the text. Also, while I could certainly get away with not finishing the buildings behind that huge white text box on the right side of the picture, I want to make sure the picture is presentable as a standalone piece.
Most of the light in this scene is faked, meaning that since there is really no direct light source in the picture (it's sort of all ambient), I can basically do whatever I want with the lighting. Everything is just generally lit from the top down, and the darkest areas are those that are completely occluded from most light (e.g. under the vehicles).

As is often the case with my pictures, working digitally I could very easily make all those geometric architectural lines perfectly ruler-straight. It's in fact much easier to do this than to laboriously paint them all manually. But that would completely kill the subtle wonkiness that's critical to the picture having a hand painted look. The slight irregularities are part of the texture. I'd rather have the picture look like a freshly painted wooden fence than a perfectly molded plastic one.

Now for some final effects... I darken and enrichify the less lit areas, and add a bright blast of... something, I dunno, pseudo light coming out of the main sky area. This is a good example of where digital tools can be used to add effects, without undermining the hand painted look and feel of the picture.

And, for continuity, here's the final picture again:
There's a saying, "the journey of a thousand miles begins with one step." Take my advice, if you're ever faced with a challenging picture like this, don't procrastinate and don't be afraid. Just start moving. Get going on what you feel you can do, and the rest will follow.
No comments:
Post a Comment